Matching a Color (F5)
 1. From the overview page select the recipe button.
 2. Then select the match icon/F5 on the
recipe menu bar.
2. Then select the match icon/F5 on the
recipe menu bar.
3. The new screen is the matching screen. (Process Data For Matching) Tab.
Ø Select the Quality/Style by browsing.
Ø Select your ‘substrate delivery’(By browsing) which
represents any differences in the substrate.
Ø Select your dyeset by double-clicking it from the
list. This will place the dye set in the
‘used dye set(s)’ section of the screen.

Ø Change the select button to input so you can type in the name of your standard.
Ø Right click on
the browse button and choose ‘measure’
from the drop down menu or browsing.
( If you only wish to measure your standard
once you may click on the spectro icon
)
4. Select individual dyes used in the dye set you
have chosen you must click on the page tab that says ‘dye set’ Tabs

Ø On the dye set tab select the individual dyes by clicking on them to high light them black.
Ø Once your dyes
are chosen you will click the Calculate
button.
6 5.This will then take you to the lab recipe
display.

Ø You will then
click the save button and display
the ‘recipe database operation’ screen. Click ‘yes’ to store the recipe.


LAB CORRECTION (F6)
 1. From the overview page select the recipe button.
2. Then select the lab correction/F6 on the recipe menu bar.
3. The screen will be Come.

4. The next screen lets you continue with ‘pass/fail and correction’ or ‘approve’.

5. If you ‘approve’ the recipe is stored.
6. If
you click ‘Pass-Fail and Correction’
the following screen appears.

7. You then click on the spectro icon to read in your batch. (The name of the batch will be the standard name with a / and a number, where the number represents the number of the correction (i.e. 1234 Blue/4)
8. Double check to make sure the formula listed is that of your batch and click save .
9. Then you click on a ‘Laboratory’ to start the lab correction.
10. Lab correction results.

11.Five screens are displayed:
Original
: The formula actually used to dye the
batch.
Standard : The formula for the dyed batch based
on the primaries
Performance
: Performance rating for each dye
Multiply : The new formula equal to the
‘performance’ times the
‘standard’
amount for each dye.
Additive : New formula equal to the ‘recipe’ amount
plus the
‘standard’ amount
minus the ‘batch’ amount.
Smart
match : New formula calculated by using Smart
Match points always use the
‘Smart
match’ formula if it is available. If there is no ‘Smart match’
formula and the ‘Performance’ amounts are between .5
and 1.5, use the
‘Multiply. If the ‘Performances’
are outside of the desired range, use the
‘Additive’ formula
.
PRODUCTION
CORRECTION (F7)
Note :
If the production correction is
accessed from Datacolor PROCESS, the additions already done (using Datacolor
PROCESS) can be taken into account for the batch. The user can define what
percentage of the previous adds should be taken.
Result if the
previous adds are not taken in account :

The previous adds are taken into account with 100%

Result if the previous adds are taken in account :

Fast Correction/(F8)
The “Fast Correction” function is
used for production or laboratory corrections without an existing recipe. It is
based on a theoretical calculated recipe of the standard or a recipe typed in
manually. This task is mainly used for production correction.


Data input:
• Quality/style, combined
process, colorant set, and standard.
• Batch (color of the dyed
substrate to be corrected).
• Dyestuffs must be selected.
Concentration and parameters can be defined.
• The acceptance limit and color
difference equitation settings can be altered.
• The recipe can be entered manually or a
theoretical recipe can be calculated.
Manual Graphical Correction
The manual graphical correction
recalculates the recipe in the basis of the altered dyestuff
concentrations.
You can start the manual
graphical modification of recipes from ...
• the recipe table
• the laboratory correction table
• the production correction table
• from the „Recipe Editor“ dialog
box.
The tolerance sphere, the
standard and the position of the current recipe are displayed.
To visualize the modification in
the tolerance sphere, the a/b path (trajectory) of each
dyestuff of the recipe is also
drawn in the graph.
The concentration displayed at
the end of the dyestuff lines represents the position of
the color you would get in the
tolerance sphere if you took this concentration for the
modified recipe. The third
concentration is the lowest concentration that results in a

Graphical points :
1.
Position
of the standard (grey).
2.
Position
of the recipe (black).
3.
Dyestuff
line:
4.
The
length of the line shows all positions of the recipe between the
concentrations of 0.7616% and 0.8636%.
5.
The
concentration 0.7808 is the minimum concentration matching the tolerance limit.
|
Action
|
Description
|
|
Click and hold down
the right mouse button.
|
Moving
the mouse forward zooms in, moving the mouse backward zooms out.
|
|
Click
and hold down the left mouse button.
|
Moving
the mouse left, right, up or down rotates the graphic in the corresponding directions.
|
|
Press F2
|
Switches
to a two-dimensional graph (a* /b*).
|
|
Press F3
|
Switches
to a two-dimensional graph (L* /b*).
|
|
Press F4
|
Switches
to a two-dimensional graph (L* /a*).
|
|
Double-click
the graph using the right mouse button.
|
The
graph view switches between parallel and perspective projection.
|
.
Modification :
• You can change the
concentration either by typing or using the buttons in the column
“New Recipe” or the column
“+Amount” to modify the recipe.
• If you click Set in the columns
“Proposition”, the recipe is set to the minimum
amount of dyestuff to match the
tolerance limit.
You can see the result of the
modification in the graph. The recipe moves to the
tolerance limit when you click Set.
User Permissions in Datacolor
On terminal server installations
it is more important than in LAN environment to know
how to limit the access rights of
the users working with the software. Since as it is not possible to have
different program levels installed on the terminal server it is more important
to work with the ‘User Permissions’ in Datacolor MATCH Textile to manage the
access rights of the individual users. For every user how connects to the
terminal server there is a login script on the server. All these users are
running the same Program version e.g. Datacolor MATCH TEXTILE
with 20 feature points. There is
no other setup possible. In order to control the user permission you should
create Datacolor MATCH TEXTILE login users for everybody how is working with
the software. The permission for each user can be defined in Datacolor MATCH
TEXTILE.
Creating a user with Datacolor MATCH TEXTILE :

Ø Start Datacolor
MATCH TEXTILE and select the task ‘User Manager’ from the ‘Tools’ menu and select ‘User Administration’.
Ø The ‘User
Administration’ dialog opens

Ø Select one of the existing users to add a new on
(there is only the user DCI if it is a new installation) and click the button ‘Add’. The ‘Add a new user like user ……’ opens.
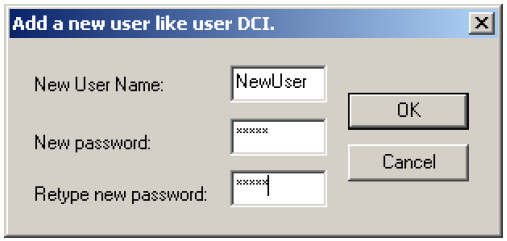
Ø Type in a name,
a password, retype the password and click OK.
Ø The program
switches back to the ‘User Administration’ dialog.
The permissions are set on the menu or task level. It is not possible to set permissions on folder or data type level.

Ø Click now the button ‘Permissions’ and define what this user should be able to do.
The new user has full rights by default I f the user ‘DCI’ was used as reference.
General user permissions :

No comments:
Post a Comment